
Lori Putnum 이란 미국 화가의 야외 사생에 대한 강의 내용이 있어 여기 옮긴다
많은 참고가 된다.
( 번역은 구글 번역, 영어 원문은 맨 뒤에 )
==================================================
표현력이 풍부한 붓놀림, 현대적인 구도, 그리고 뛰어난 색채 활용으로 유명한 내슈빌 출신의
로리 퍼트넘은 소규모에서 중규모의 야외 그림을 그리고, 자신의 스튜디오에서는
대형 회화를 제작합니다. 16개국과 수백 개의 작은 마을에서 그림을 그려 온 그녀는
인터뷰에서 말했듯이, 실제 생활에서 영감을 받아 작품을 만드는 것이 스튜디오 회화에서도
신선함을 유지하는 데 도움이 된다고 믿습니다.
야외 그림은 예술가로서 당신에게 무엇을 주나요? 왜 밖으로 나가 그림을 그리시나요?
로리 퍼트넘: 지식은 제가 야외에서 그림을 그릴 때 가장 중요하게 여기는 것입니다.
수많은 질문에 대한 해답이 눈앞에 있습니다. 명도, 색상, 그리고 엣지가 가장 중요한 세 가지 요소입니다.
작업 과정을 설명해 주시겠어요? 각 단계에서 무엇을 파악해야 하나요?
야외에서 그림을 그릴 때를 말씀하시는 거라면, 저에게 정말 잘 맞는 작업 과정을
말씀드리겠습니다.
먼저, 저는 종이에 필요한 만큼 계획을 세웁니다. 상황마다 다릅니다.
때로는 대략적인 썸네일 스케치만 있으면 바로 물감 작업에 들어갑니다.
스케치 대신 그림을 그리지 않도록 마커를 사용하는 것을 좋아합니다.
캔버스에 손을 대기 전에 잠재적인 문제를 해결하는 데 필요한 시간을 충분히 갖습니다.
실외 화가들이 겪는 가장 큰 어려움 중 하나는 명도를 정확하게 맞추는 것입니다.
저는 스케치에 중간 명도를 어디에 배치해야 할지 메모해 둡니다. 제 혼합 표면은
중간 명도이므로 그보다 어둡거나 밝은 부분을 비교할 수 있습니다.
이 명도를 기준으로 나머지 모든 것을 측정합니다. 나중에 색상을 혼합할 때,
혼합 영역과 명도가 적절한지 확인할 수 있습니다. 명도 문제가 해결된 것입니다.
모든 어려운 결정을 해결했다고 확신할 때, 어떻게 시작하는 것이 가장 좋은지에 대한
질문에 대한 답도 얻었다고 생각합니다. 대부분의 경우, 캔버스에 특정 색상을 칠하여
장면 전체에 공통된 실처럼 퍼져 나가는 느낌을 주는 색조를 만듭니다.
때로는 매우 색채가 풍부할 수도 있지만, 항상 그런 것은 아닙니다.
요리와 비슷하다고 생각해 보세요. 요리 전체에 풍미가 배는 것이지, 역겨운 것이 아닙니다.
예를 들어, 진한 미트 소스를 요리한다면 양파와 마늘로 시작할 수 있습니다.
레몬 파이를 굽는다고 해서 같은 재료로 시작하지는 않을 것입니다.
그래서 저는 캔버스에 미리 스테인을 칠하지 않습니다. 저는 기다리면서 눈앞에 보이는 것에 반응합니다.
필요하다면 몇 개의 표시나 선을 그려서 배치합니다. 다시 말하지만, 모든 그림이
똑같은 방식으로 처리되는 것은 아닙니다. 저는 장면에 맞는 방식으로 그리는 것이
중요하다고 생각합니다. 즉, 선 없이 큰 덩어리로만 그림을 그릴 수도 있습니다.
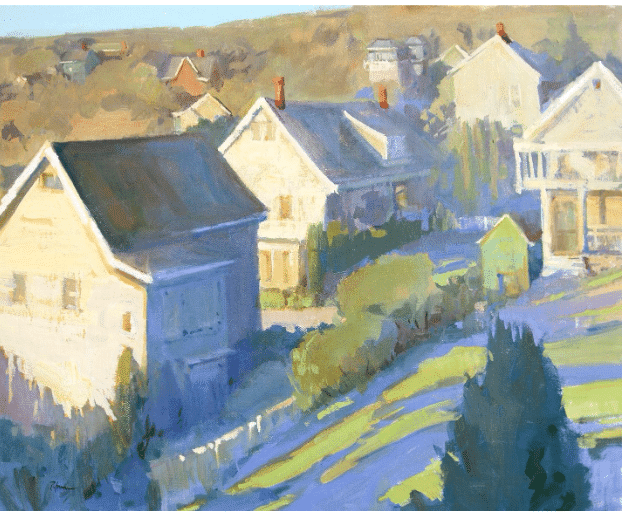
이 예시에서는 강한 빛과 그림자가 있는 장면에 어떻게 접근할지 생각해 보겠습니다.

그림자와 빛을 위해 얇게 한 겹을 덧칠하는데, 제 썸네일 스케치를 참고해서 그립니다.
이 패턴들은 아주 평면적이고 그래픽적인 패턴입니다. 큰 도형에서 중간 크기 도형,
그리고 작은 도형으로, 그리고 캔버스 전체에 동시에 작업합니다.
보통 어두운 색에서 밝은 색으로 작업하지만, 그림이 매우 밝거나 작은 그림자 도형만 있을 때는
반대로 작업할 수도 있습니다. 각 겹을 칠할 때마다 조금씩 두꺼워지면서 도형을 분해하면서
물감을 계속 쌓아 올리는 것이 중요합니다.
또한 부드러운 붓과 부드러운 터치를 사용하고, 도구들이 모든 작업을 하도록 합니다.
이렇게 하면 의도적으로 힘을 조금 더 가할 때만 아래 도형이 바깥 도형과 섞입니다.
저는 제 작업에서 도형의 진행을 좋아합니다. 어떤 도형은 상당히 크게, 어떤 도형은
중간 크기로, 또 어떤 도형은 작게 분해됩니다.
사람들은 제가 언제 완성했는지 어떻게 아냐고 묻습니다. 저는 이젤에서 꽤 자주 물러나는데,
별다른 이유 없이 작은 도형만 만들고 있는 자신을 발견하면 멈춥니다.
사실, 대부분의 경우 마지막 25%는 너무 작은 모양들을 많이 넣은 부분을
제거하는 데 사용됩니다. 저는 더 단순한 게 더 좋습니다..

그림을 그리려면 어떤 참고 자료가 필요할까요? (그리고 어떤 참고 자료가 필요하지 않을까요?)
참고 자료는 단지 아이디어의 불씨만 지피면 됩니다. 저는 작업실에서 작업할 때는
참고 자료를 너무 자세히 들여다보지 않으려고 노력합니다.
사실, 사진은 전혀 보지 않고 현장 조사 자료만 보고 그리거나, 상상력을 자극하는
작은 무언가가 있는 사진만 보고 그리는 편입니다. 그러면 모방하는 대신 창작할 수 있으니까요.
색채에 어떻게 접근하시나요? 주변 색만 사용하시나요, 아니면 더 나은 그림을 만들기 위해
색을 바꾸시나요? 어떻게요?
상황에 따라 다릅니다. 야외에서 혼자 성장하기 위해 작업할 때는 보이는 대로
그림을 그립니다. 그게 바로 지식을 쌓는 부분입니다. 하지만 그날 제 임무가 훌륭한 그림을
그리는 것이라면, 계획 단계에서 가장 강렬한 색을 어디에 넣을지, 그 색이 실제로 어떤 색일지,
그리고 실제로 화면에 있는 색을 좀 더 중립적으로 바꿔야 할지 고민합니다.

학생들이 색채를 다루는 데 있어 가장 큰 어려움은 무엇인가요? 어떤 조언을 해주시나요?
저와 함께 공부하는 모든 학생들은 더욱 화려하게 표현하고 싶어 합니다.
보통 처음부터 너무 많은 색을 사용하는 경우가 많죠. 제 그림은 대체로 중성적인 색채를
사용하며, 어떤 부분은 약간 더 강렬합니다. 중성색이 많으면 채도가 많이 필요하지 않아도
그림이 실제로 색채로 가득 찬 것처럼 보입니다.
제 워크숍은 대개 세 가지 기본 색상과 흰색으로만 구성된 팔레트를 사용합니다.
색채에 대한 학습은 바로 그 단계에서 이루어집니다. 팔레트에서 프탈로 그린과
프러시안 블루를 제거하고, 캐드 옐로, 나프톨 레드, 군청, 그리고 흰색만 사용하여
다음 50점의 그림을 그려 보세요. 훨씬 더 나은 결과를 얻을 수 있을 것입니다.

작품의 구성을 어떻게 구상하시나요? 그림이 탄탄한 구성을 갖추려면 무엇이 필요할까요?
저는 디자인과 구성을 다른 개념으로 생각합니다. 디자인은 추상적인 개념입니다.
균형(더 나아가 불균형)과 무게감을 포함하고 있으며, 궁극적으로 구성을 지탱합니다.
반면 구성은 보는 사람에게 전달하고자 하는 바를 전달할 수 있도록 구성되어야 합니다.
구성의 모든 요소는 시각적 메시지를 더 명확하게 이해하도록 해야 합니다.
메시지를 강화하지 않는 요소는 구성의 일부가 되어서는 안 됩니다.
그저 세부 사항일 뿐입니다. 그런 요소는 제외하세요.
저는 먼저 탄탄한 디자인을 찾고, 이를 뒷받침하기 위해 장면의 요소들을 편집합니다.
학생들은 제 작품의 초점에 대해 질문합니다. 모든 그림의 메시지에 초점이 필요한 것은 아닙니다.
충격과 경외감을 느끼실 거라는 건 알지만, 사실입니다. 초점이 있다고 해서
"이봐, 나는 커다란 붉은 헛간이야. 나를 봐."라고 소리칠 필요는 없습니다.
초점을 만들고 싶다면, 초점을 다루는 더 미묘한 방법들이 있습니다.

야외 그림은 실력에 관계없이 누구에게나 어렵게 느껴질 수 있습니다. 초보자에게 조언이 있을까요?
다음 사항을 기억하세요.
야외 그림은 당신이 해본 것 중 가장 힘든 스포츠가 될 것입니다. 그 보상은 그만한 가치가 있습니다.
낙담하고, 벌레에 물리고, 비를 맞고, 이젤이 넘어져 부서질 수도 있습니다.
이 모든 일이 같은 날에 일어날 가능성이 높습니다. 둘째 날에는 적어도 이 중 하나는 일어나지
않을 것이기 때문에 더 성공적이라고 느낄 것입니다.
모든 그림이 잘 되는 것은 아닙니다. 어떻게 생각하든 모든 그림이 실제로
성공하는 것은 아닙니다. 이는 당신이 이름을 댈 수 있는 모든 화가, 모든 화가에게 해당됩니다.
타이 콥은 24시즌 동안 타율 .366을 기록하며 메이저 리그 야구에서
통산 타율 1위를 기록했습니다. 만약 당신이 선수 생활을 하면서 10점 만점에 4점을 받는다면,
당신은 타이보다 타율이 더 좋은 것입니다.
가장 좋은 소식은? 모든 그림에는 교훈이 있다는 것입니다.
때로는 무엇을 해야 하는지가 중요합니다. 때로는 무엇을 하지 말아야 할지 고민하게 됩니다.
어느 쪽이든, 시간 낭비는 금물입니다.
붓질에서 무엇을 원하시나요? 어떻게 하면 그걸 얻을 수 있을까요?
움직임과 고요함 - 모든 획에는 목적이 있으며, 둘 중 하나를 떠올리게 합니다.
적절한 도구가 있으면 저는 그 목적을 달성할 수 있습니다.
각 붓의 종류, 구성, 모양은 고유한 표현을 가능하게 하며, 붓에 대한 첫인상이 항상 같은 것은 아닙니다.
저는 붓과 다른 도구들을 많이 실험하며, 항상 새로운 사용법을 찾고 있습니다.
학생들은 제가 특정 붓을 어떻게 사용하는지 보고 종종 놀랍니다.
한 가지 확실한 것은 붓은 여러 면과 표면을 가지고 있다는 것입니다.
저는 주로 가장 긴 모양(아주 긴 플랫과 에그버트)을 사용하기 때문에 붓의 모든 면에 힘을 주고
그림 표면과 평행하게 유지할 수 있습니다. 그런 다음 압력을 조절하여 원하는 모양과
가장자리를 얻을 수 있습니다. 붓의 압력과 물감의 농도를 이해하는 것은 가파른 학습 곡선입니다.
저는 젖은 상태에서 젖은 상태로 페인팅하는 걸 좋아하기 때문에,
제가 특히 좋아하는 효과 중 하나는 초기 단계에서는 Rosemary & Co Classic 시리즈와 같은
딱딱한 브러시를 사용한 다음, 점차 아이보리 시리즈와 같이 점점 더 부드러운 브러시로
옮겨가다가 에버그린을 사용한 다음, 마지막으로 마스터스 초이스나 퓨어 세이블을
사용하여 마지막 층을 그리는 것입니다.

완성된 작품은 어떻게 평가하시나요?
페이스북에 바로 올리고 싶은 유혹이 들죠. 하지만 좋은 생각은 거의 없습니다.
스튜디오 작품이라면 작업 과정 사진을 보여주거나 작업 과정을 영상으로 만들 수도 있지만,
며칠 동안 미뤄두었다가 다시 보는 것이 항상 더 나은 선택입니다. 많은 경우,
하루가 끝나고 나서야 뭔가 정말 좋았다고 생각하게 됩니다.
그런데 다음 날, 도대체 무슨 생각을 하고 있었던 걸까요? 물론, 그 반대의 상황이 벌어지면
더 좋습니다. 밤새도록 그림이 얼마나 끔찍할까 생각했던 생각이 아침에 일어났을 때
거짓으로 밝혀지는 거죠. 모든 형태가 제 마음에 들 정도로 완성되면 완성된 것입니다.


===========================================================================
Recognized for her expressive brushwork, contemporary compositions, and intelligent use of color, Nashville native Lori Putnam paints small to medium-sized works en plein air and creates large paintings in her studio. Having painted in 16 different countries and hundreds of small towns and villages, she believes, as she told us in an interview, that creating work from life helps her maintain freshness in her studio paintings as well.
What does plein air painting give you as an artist? Why do you head outside to paint?
Lori Putnam: Knowledge — the number one thing I get when I paint outdoors. So many questions are answered right there in front of me. Value, color, and edge are the three biggies.
Could you walk us through your process? What do you need to have figured out at each stage?
Assuming you mean when painting outdoors, I’ll discuss a process that works really well for me.
First, I do as much planning as I feel I need on paper. Every situation is different. Sometimes I only need a rough thumbnail sketch and I’m on to the paint. I like to use markers for this so I don’t make a drawing instead of a sketch. I take as long as it takes to sort out potential problems before I ever touch the canvas.
One of the biggest problems outdoor painters have is getting values right. I’ll make notes on my sketch to indicate where in the scene I need to place my mid-value. My mixing surface is a mid-value, so I can compare anything darker or lighter to that. It is the cornerstone from which I measure everything else. Later, when I mix colors, I will then be able to tell if they are the right value relationship to my mixing area. Value problems solved.
When I feel confident I’ve sorted out all the gnarly decisions, I know I will also have answered the question about how best to begin. Most of the time that is by toning the canvas with a color I sense travels throughout the scene like a common thread. Sometimes that can be very chromatic, but not always. Think of it like cooking. You want a flavor that runs through the dish, not something disgusting. For instance, if you’re cooking a rich meat sauce, you may begin with onions and garlic. You wouldn’t start with the same ingredients if you were baking a lemon pie. That is why I do not pre-stain my canvas. I wait and react to what I see before me.
If I need to, I’ll draw a few marks or lines for placement. Again, not every painting is handled the exact same way. I think that’s important — to paint in a manner for which the scene calls. This could mean digging right in with just big masses and no lines at all. For this example, I’ll think of how I might approach a scene with strong light and shadow.
I lay in a fairly thin layer for the shadow and one for the light, using my thumbnail sketch as my reference. These are really flat, graphic patterns. I work from large shapes to medium-sized shapes to small shapes, and all over the canvas at once. Usually I work from dark to light, but if the painting is very high-key or has only small shadow shapes, I may work the other way around. It’s important to continue to build up the paint with each breaking down of shapes by getting slightly thicker with each layer.
I also use a softer brush and a softer touch and let the tools do all the work. That way the underlayers of paint only mix with the outer layers if I intentionally add a little more pressure. I like a progression of shapes in my work — some stay fairly large while others break down to medium and still others to small.
People ask how I know when I’m finished. I stand back from the easel fairly often, and when I find myself just making smaller shapes for no apparent reason, I stop. Most of the time, in fact, the last 25 percent of the process is taking out where I put in too many small shapes. Simpler is better for me
What does a reference need to have for you to want to paint it? (And what don’t you need from it?)
A reference need only spark an idea. When I’m working in the studio, I try not to look too closely at the reference. In fact, I’d rather just paint from field studies and no photograph, or from a photograph that has just a little something to tickle my imagination. Then I can create, rather than copy.
How do you approach color? Do you use only local color, or do you change the color to make a better painting? How?
Depends. If I’m outdoors and working on my own for growth, I put down what I see. That’s the knowledge-gathering part. If, however, my job that day is to paint a great painting, I’ll make choices in the planning stage about where to put the most intense color and think about what that color will actually be, as well as choices on where I may need to sacrifice some color that is really in the scene by making it more neutral.
What’s the biggest challenge you see with students and color? What advice do you give them?
Everyone who studies with me wants to be more colorful. Usually, they are using too much color to begin with. My paintings are really pretty neutral, with some places slightly more intense. If you have a lot of neutrals, you do not need much chroma to make a painting really seem filled with it.
Oftentimes, my workshops are taught with a primary palette of just three colors and white. Learning about colors happens on that level. Take the phthalo green and Prussian blue off your palette and just work with cad yellow, naphthol red, and ultramarine blue plus white for the next 50 paintings. You will be much better for it.
How do you think through the composition of your piece? What does a painting need to have to have a strong composition?
I view design and composition as different ideas. Design is the abstract. It involves balance (better yet, imbalance) and weight and ultimately supports the composition. The composition, on the other hand, must be put together in such a way as to tell the viewer what it is that you want to say. Everything in the composition should bring clearer understanding of the visual statement. Anything that does not strengthen the statement should not be part of the composition. It’s just detail. Leave it out.
I look for strong design first, and edit elements in the scene to support that. Students will ask me about my focal point. Not every painting’s statement needs one. I know … shock and awe. But it’s true. And if it does have a focal point, it doesn’t have to scream at you, “Hey, I’m the big red barn. Look at me.” There are more subtle ways to handle a focal point if it is your intention to have one.
Plein air painting can feel intimidating to a painter of any skill level. Any advice to a beginner?
Remember these things:
Plein air painting will be the toughest sport you’ve ever played. The reward is worth it.
You will get discouraged, bitten by bugs, rained on, and your easel will fall over and break. It is likely that all of this will happen on the same day. On day two, you’ll feel more successful because at least one of those things probably will not happen.
They don’t all turn out well. No matter what you think, not every painting actually works. That is true for every painter you can name …every painter. Ty Cobb batted .366 over 24 seasons, making his career batting average the highest in Major League Baseball. If, in the course of your career, you average four out of 10, you’re batting better than Ty.
The best news? Every painting has a lesson. Sometimes it is what to do; sometimes it is what not to do. Either way, it’s time well spent.
What do you want from your brushwork? How do you get that?
Movement or silence — every stroke has a purpose and is meant to evoke either one or the other. Having the right tools helps me do that. Each type of brush, its composition and its shape, offers unique mark-making, and it isn’t always what your first impression of the brush is. I experiment a lot with brushes and other tools and am always finding new ways to use them.
Students are often surprised to see how I use a specific brush. One thing is certain — a brush has many sides and surface areas. Because I use mostly those with the longest shapes (extra-long flats and egberts), I can really load the brush on all sides and hold it parallel to the painting surface. Then, by altering the pressure, I achieve whatever shape and edge I want. Understanding brush pressure and paint consistency is a steep learning curve. Because I love to paint wet-in-wet, one effect I particularly like is to use stiffer brushes such as Rosemary & Co Classic series in the earlier stages, then slowly move to slightly softer and slightly softer, like to the Ivory series, then the Evergreens, and finally either Master’s Choice or pure sable for the final layers.
How do you assess a piece after it’s finished?
The temptation is to immediately post it on Facebook. That is rarely a good idea. If it’s a studio piece, I may show some progress shots or create a video of the process, but setting it aside for a few days and then revisiting it is always a better choice. Many times, at the end of the day, I will think I really liked something. The next day I wonder what in the world I was thinking. Of course, it’s better when the opposite happens and the thoughts I have all night about how horrible a painting is turn out to be false when I wake up in the morning. If all of the shapes have been resolved to my satisfaction, then I know it is finished.
'그림공부' 카테고리의 다른 글
| ( 그림 공부 ) 당신의 발전을 방해할 수 있는 유화에 대한 7가지 진실 (8) | 2025.06.15 |
|---|---|
| ( 그림공부 ) Gouache 와 Watercolor 비교 (3) | 2025.06.13 |
| ( 그림 공부 ) 수채화로 물을 그리는 방법 (2) | 2025.04.25 |
| ( 그림공부 ) 인물화 그리는 방법에 대해서 (0) | 2025.04.03 |
| ( 그림공부 ) 야생화와 풀을 잘 그리기 위한 7가지 조언 (4) | 2025.03.18 |


